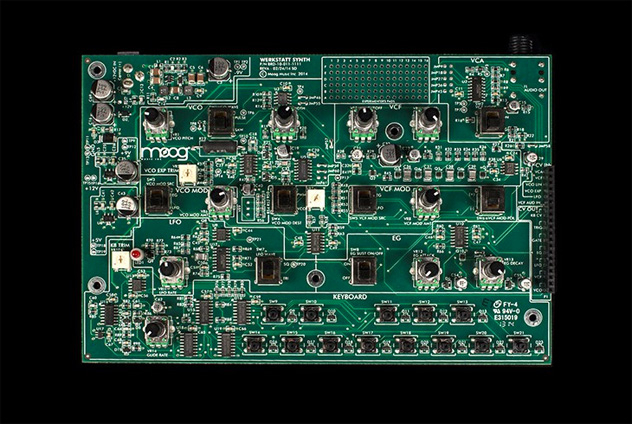
- Most producers will be curious about what's happening under the hood of their gear, at least at some level. Moog's fully analogue Werkstatt synth was created to cater directly to this. It was initially conceived as a foundation for "engineering VIP" workshops at Moogfest 2014, and it's now been released to the general public. At those workshops, it was a true kit that required soldering, but it's now only provided as a screw-together version, with a pre-assembled PCB. Still, this presentation means that the first thing you see when you open the box is the bare PCB. That makes you more prepared to disassemble it again and get hacking, which is what the makers intended. The Werkstatt is a teaching aid that provides a thorough run-through of both the outer and inner workings of a synthesizer.
The unit is about the size of a VHS tape and is very clearly laid out. The functionality is at a bare minimum—you have all the main features of a common subtractive synthesizer but no bells or whistles. There's one oscillator (pulse or saw only), with pulse width. There's a continuous knob for frequency, and a row of buttons that acts as a keyboard at the bottom of the unit. It's not the most playable or musical synthesizer you'll come across—you can hack it to accept a sequencer or MIDI-in, but the task isn't easy. The filter is, happily, the famous 24 dB/octave Moog ladder filter, and there are cutoff and resonance controls only. The amp is either controlled by the envelope generator or continuously on. The three sections that make the signal path—VCO to VCF to VCA—are arranged sequentially along the top row.
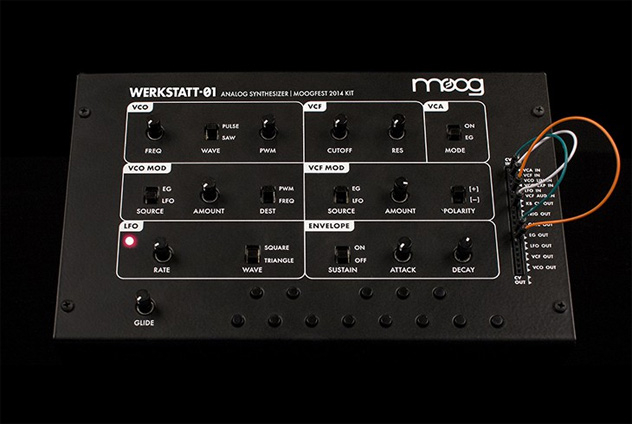 Below that is a row with sections (each clearly marked out) that affect the VCO and VCF with modulation. They each have separate source and amount controls, and while the oscillator can be affected with either pitch or pulse width modulation, the filter modulation affects the cutoff only, with either positive or negative polarity. On the bottom row are the modulators: a square or triangle LFO with rate control, and a simple attack-decay envelope with optional sustain. It's really easy to get your head around things from looking at the front panel, and this, for beginners, should ease the learning curve greatly. The back includes a mono jack and power socket, and there's also a glide control. It may be a fanboy-ish thing to say, but the Moog logo on the front gives the sense that you're learning from the best.
 Moog have put together a website, Werkstatt Workshop, that's a pretty thorough tutorial resource. Short of a detailed explanation of the design theory behind the schematics, you'll find pretty much anything. The Lessons section runs through a wide range of scientific, technical, mathematical and musical principles that, if followed completely, should give a thorough bedrock to a newcomer's understanding; the level of prior knowledge assumed is pitched toward such a person. These lessons are backed up with hands-on examples using the Werkstatt. There's also a dedicated Projects section that generally uses the patchbay on the right of the unit in tandem with external bits of electronics (including an Arduino for many of them).
The patchbay expands the basic functions of the front panel, providing a more advanced set of modulation possibilities by exposing some control voltages. The outputs are doubled up, so you can route a source to more than one destination, and the inputs include an audio input that goes in just before the filter. In terms of sources and destinations, the usual culprits are present (the full list is on the website), with a notable absence of CV and gate-in, in case you were wondering if you could hook it up to your modular straight away. Some of the more interesting routings include VCO-out to VCO frequency-in (i.e. self-inflicted frequency modulation), and ones that allow you to use the LFO as a second oscillator. You can get an expansion board if you want a jack interface for external equipment. Some of the lessons use this area in later stages to deepen understanding; in others it takes a more central role, and still others use an Arduino with it to exact various trickery, including providing a pseudo-oscilloscope display of the waveform.
Going even deeper, there are various test points, jumpers and an experimenter's pad on the PCB itself, which are intended to help to hack away to your heart's content. (It'll void the warranty, though. Moog also "do not recommend the modification of this product," but this statement is half obligatory legal blurb, half tongue-in-cheek irony.) There are a couple of projects in the Workshop that involve the bare PCB, but the most enjoyment can be had over at Sparkfun, where you can learn how to add a sequencer or a MIDI input. There's also a forum, which has been fairly quiet to date but does have a few tasty morsels on it.
Sound-wise, the Werkstatt is quite primitive, and with its general ethos as well, it feels like something from the BBC Radiophonic Workshop to use, at least when you start. However, it's a Moog, and a lot of impressive sounds can be teased out of it when you know what you're doing—check out the samples for an idea. But primarily, this is a learning tool, and a very thorough and well thought-out one at that. You can use it to learn the basics, but you'll get the most out of it if you dig deep. It's a great companion on the journey towards a full understanding of analogue synthesizer electronics. If you're not satisfied with looking at the outside of your synths and yearn to know what's going on inside, I can't recommend this enough.
Ratings:
Cost: 3.6
Versatility: 4.9
Sound: 4.1
Build: 4.8
Ease of use: 4.5
Moog have put together a website, Werkstatt Workshop, that's a pretty thorough tutorial resource. Short of a detailed explanation of the design theory behind the schematics, you'll find pretty much anything. The Lessons section runs through a wide range of scientific, technical, mathematical and musical principles that, if followed completely, should give a thorough bedrock to a newcomer's understanding; the level of prior knowledge assumed is pitched toward such a person. These lessons are backed up with hands-on examples using the Werkstatt. There's also a dedicated Projects section that generally uses the patchbay on the right of the unit in tandem with external bits of electronics (including an Arduino for many of them).
The patchbay expands the basic functions of the front panel, providing a more advanced set of modulation possibilities by exposing some control voltages. The outputs are doubled up, so you can route a source to more than one destination, and the inputs include an audio input that goes in just before the filter. In terms of sources and destinations, the usual culprits are present (the full list is on the website), with a notable absence of CV and gate-in, in case you were wondering if you could hook it up to your modular straight away. Some of the more interesting routings include VCO-out to VCO frequency-in (i.e. self-inflicted frequency modulation), and ones that allow you to use the LFO as a second oscillator. You can get an expansion board if you want a jack interface for external equipment. Some of the lessons use this area in later stages to deepen understanding; in others it takes a more central role, and still others use an Arduino with it to exact various trickery, including providing a pseudo-oscilloscope display of the waveform.
Going even deeper, there are various test points, jumpers and an experimenter's pad on the PCB itself, which are intended to help to hack away to your heart's content. (It'll void the warranty, though. Moog also "do not recommend the modification of this product," but this statement is half obligatory legal blurb, half tongue-in-cheek irony.) There are a couple of projects in the Workshop that involve the bare PCB, but the most enjoyment can be had over at Sparkfun, where you can learn how to add a sequencer or a MIDI input. There's also a forum, which has been fairly quiet to date but does have a few tasty morsels on it.
Sound-wise, the Werkstatt is quite primitive, and with its general ethos as well, it feels like something from the BBC Radiophonic Workshop to use, at least when you start. However, it's a Moog, and a lot of impressive sounds can be teased out of it when you know what you're doing—check out the samples for an idea. But primarily, this is a learning tool, and a very thorough and well thought-out one at that. You can use it to learn the basics, but you'll get the most out of it if you dig deep. It's a great companion on the journey towards a full understanding of analogue synthesizer electronics. If you're not satisfied with looking at the outside of your synths and yearn to know what's going on inside, I can't recommend this enough.
Ratings:
Cost: 3.6
Versatility: 4.9
Sound: 4.1
Build: 4.8
Ease of use: 4.5